Thursday, March 31, 2016

Attracting Wildlife to Your Landscape


If you build it, they will come

The size of a yard has little to do with how much wildlife it attracts. Creating habitats that meet basic wildlife needs is what will populate your yard with area wildlife. Your plan may be as general or specific as you desire. If the wildlife you are hoping to attract is something very specific, some research will be required. If you are trying to attract specific butterflies you will find that they feed on very specific host plants. For example, the Karner Blue butterfly is endangered and found primarily in Wisconsin. The caterpillar feeds only on native wild lupine. But wait, if that's all you plant the adult butterfly will quickly fly off in search of milkweed hosts to feed on. 

Some initial parameters to consider are your soil conditions, sunlight, and growing zone. Write a list of native plants that will thrive in the conditions you found in your yard. Includes plants in the aster family such as coneflowers and sunflowers. Dogwoods, serviceberries, and viburnums and mixed grasses should also be included. For more plant options search our plant gallery using the Attract Wildlife Category. While you do not have to stick with 100% natives, pay special attention to how non-natives spread. If it is listed as even mildly invasive or aggressive, I would choose an alternative species.

Food & Water

Nothing attracts wildlife like a water garden. If the budget is tight, consider a pondless waterfall or decorative fountain. Water is essential for drinking, bathing and wildlife reproduction. These types of water sources not only provide the water but an abundance of additional wildlife. The filtration and movement of the water in circulating systems will also reduce the mosquito population rather than add to it. 


Cover & Protection

It is important to mix the edge treatments of a water feature as different wildlife species will prefer different types of cover. Some prefer the canopy of shrubs while others prefer ground cover or grasses. While you can provide many places for wildlife to live using only specific plant selections, you may also want to create some yourself. Often these habitats can be found by mistake. A brush or compost pile, fire wood stack, or a dying tree can all provide excellent habitat. So before you rush to remove an old scrag, consider working it into the overall design. As far as some of your new friends are concerned, it is actually a 5-star hotel. You may also consider constructing some more formal housing such as a bird house or a bat house.

A Place to Raise their Young
It is important to research all phases of the life cycle when considering rearing habitats. This is another area where the construction of a bird house or nesting box may be necessary if other habitats can not be provided. If your lot has no mature trees, for example, a bird house built on a tall pole may be required until your trees mature. Consider masses of host plants, in which case you are making an "offering" to the caterpillar stage that you expect to either outgrow the consumption or replace the hosts each year.  You can look up specific host plants for butterflies here. As your plan progresses keep in mind the best thing you can do for all your new neighbors is to maintain the garden in an environmentally friendly way. 

Monday, March 21, 2016

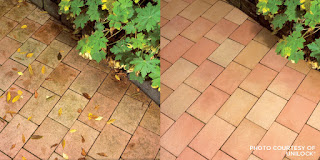
Spring Maintenance for Paver Driveways, Patios and Walkways


It’s spring cleaning season and yes, even your outdoor living spaces deserve some TLC!  Here are some preventative maintenance steps you can take at this time of year to ensure your project continues to look great through this patio season, and beyond.


Inspect the perimeter of the project: Look for areas where the joints between the stones are getting larger (commonly referred to as “creep”). “Creep” can be caused by stresses of the winter months or heavy use that has caused the stones to push out. Be sure to lift any areas along the edge that need repair.  Usually, this is just a matter of a few stones along the perimeter.  Be sure to clean the sides of the pavers before reinstalling. If you do not remove the sand from the sides of the stones it will be very difficult to get them back into place properly.  If the joints were filled with polymeric sand you may find that it is stuck to the side of the paver.  If this is the case, wet the stone to help soften up the sand and then use a putty knife to scrape the material off the sides of the paver. If there is no edge restraint installed, you should consider installing some.  There are a number of great “invisible edge” restraints available that are easy to install and are just spiked down into the base materials.   It is very important that the edge restraint is sitting directly on the compacted granular base, not the soft soils surrounding the project, as the spikes will not hold in the softer materials.  If you do not have a good base to spike the restraint to, you should do a little excavation and install a good stable base.

 Inspect the surface for any dips:   Dips in the pavement surface are usually caused by base or sub base settlement; new homes that have had a lot of property grading prior to the building of the home are more prone to this. Settlement should always be addressed, as it can cause water to pool on the surface which can create a hazard (winter ice!) in the short term and will lead to deeper dips in the long term. Identify the area that has been affected and mark with chalk. The most difficult part of this job is getting the first stone out!  If possible, try to start at an edge and work your way to the problem area. If this approach is not practical then you can try a couple of screwdrivers down either side of a stone to pry it up. Blasting the sand out with a hose first makes this much easier. Always start with the smallest stone in the pattern, as it will be the easiest one to get out. Once you get the first stone out, you can get under the other stones and the job becomes much easier.  When you have removed all the stones, re-level the area with the appropriate amount of sand and reinstall the stones, taking care to clean side of all the stones. You can tamp the stones with a block of wood placed on the surface and hitting with a hammer.  Never strike the surface of the stone directly as this can damage the paver surface.

       Inspect the surface for stains: You will be surprised what a good cleaning will do after a long winter to bring life back to your paving stones! If there are no serious stains to address, then a good pressure wash will do the job. If a pressure washer is not available, use a bit of dish detergent in some water and clean the area with a stiff bristle broom. For stains, or a paver surface requiring more serious cleaning, consider using a specialized concrete cleaner.  The most import tip to remember with any concrete cleaner is to read the instructions. There are right and wrong ways to use these products. The wrong way will diminish the effectiveness of the cleaner and may even lead to discoloration of the paver. Test the cleaner in a small unobtrusive area to make sure you are happy with the results before applying to the entire surface.

4.       Inspect the Joints:  If there are small weeds in the joints remove them.  Weeds are caused when seeds blow into joints and then germinate; they do not grow from beneath the pavers. This is one of the reasons why it’s so important to ensure that the material in the joints is in good shape. If your project has regular, un-stabilized sand in the joints, you may need to top it up so the joints remain full. If your project utilizes a stabilized sand (Polymeric or Unilock Easy Pro for example), or if you have used a joint stabilizing sealer on top of regular sand, this is less likely to be needed.  However, if this type of jointing material is in need of repair the best approach is to remove all of the old material and start fresh with new material.

5.       Consider Sealing: Sealing a paver surface is not necessary, but some homeowners like the way a sealer can enhance the color of their pavers and provide some stain protection.  If you chose to seal your paver project, you will need to re-seal every 3-5 years. High traffic areas like driveways will need to be re-sealed most often, but you should never apply sealer more frequently than 2 years. When selecting sealers, you can choose between a high gloss sealer, which will enhance the color of your paving stones or a matte finish that will simply help protect the pavers. Also, if you are re-sealing it is very important to use the same sealant as originally applied, there are a number of different sealants out there all having their own formulas. One of the critical components of re-sealing is that the new coat should dissolve the first coat and bond together to create a consistent surface protection. If you apply different sealers, you may not get this bonding action or you may have a chemical reaction that will turn the sealant milky. If you do not know what sealant has been applied previously then do a small test of an obscure area of pavers and see how the new sealer reacts.

Following this little bit of preventative maintenance every year will protect your investment and keep it looking great for years!


Contact Form

Name

Email *

Message *