Thursday, March 31, 2016

Attracting Wildlife to Your Landscape


If you build it, they will come

The size of a yard has little to do with how much wildlife it attracts. Creating habitats that meet basic wildlife needs is what will populate your yard with area wildlife. Your plan may be as general or specific as you desire. If the wildlife you are hoping to attract is something very specific, some research will be required. If you are trying to attract specific butterflies you will find that they feed on very specific host plants. For example, the Karner Blue butterfly is endangered and found primarily in Wisconsin. The caterpillar feeds only on native wild lupine. But wait, if that's all you plant the adult butterfly will quickly fly off in search of milkweed hosts to feed on. 

Some initial parameters to consider are your soil conditions, sunlight, and growing zone. Write a list of native plants that will thrive in the conditions you found in your yard. Includes plants in the aster family such as coneflowers and sunflowers. Dogwoods, serviceberries, and viburnums and mixed grasses should also be included. For more plant options search our plant gallery using the Attract Wildlife Category. While you do not have to stick with 100% natives, pay special attention to how non-natives spread. If it is listed as even mildly invasive or aggressive, I would choose an alternative species.

Food & Water

Nothing attracts wildlife like a water garden. If the budget is tight, consider a pondless waterfall or decorative fountain. Water is essential for drinking, bathing and wildlife reproduction. These types of water sources not only provide the water but an abundance of additional wildlife. The filtration and movement of the water in circulating systems will also reduce the mosquito population rather than add to it. 


Cover & Protection

It is important to mix the edge treatments of a water feature as different wildlife species will prefer different types of cover. Some prefer the canopy of shrubs while others prefer ground cover or grasses. While you can provide many places for wildlife to live using only specific plant selections, you may also want to create some yourself. Often these habitats can be found by mistake. A brush or compost pile, fire wood stack, or a dying tree can all provide excellent habitat. So before you rush to remove an old scrag, consider working it into the overall design. As far as some of your new friends are concerned, it is actually a 5-star hotel. You may also consider constructing some more formal housing such as a bird house or a bat house.

A Place to Raise their Young
It is important to research all phases of the life cycle when considering rearing habitats. This is another area where the construction of a bird house or nesting box may be necessary if other habitats can not be provided. If your lot has no mature trees, for example, a bird house built on a tall pole may be required until your trees mature. Consider masses of host plants, in which case you are making an "offering" to the caterpillar stage that you expect to either outgrow the consumption or replace the hosts each year.  You can look up specific host plants for butterflies here. As your plan progresses keep in mind the best thing you can do for all your new neighbors is to maintain the garden in an environmentally friendly way. 

Monday, March 21, 2016

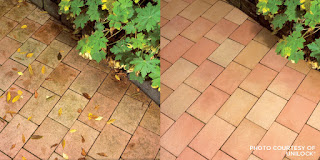
Spring Maintenance for Paver Driveways, Patios and Walkways


It’s spring cleaning season and yes, even your outdoor living spaces deserve some TLC!  Here are some preventative maintenance steps you can take at this time of year to ensure your project continues to look great through this patio season, and beyond.


Inspect the perimeter of the project: Look for areas where the joints between the stones are getting larger (commonly referred to as “creep”). “Creep” can be caused by stresses of the winter months or heavy use that has caused the stones to push out. Be sure to lift any areas along the edge that need repair.  Usually, this is just a matter of a few stones along the perimeter.  Be sure to clean the sides of the pavers before reinstalling. If you do not remove the sand from the sides of the stones it will be very difficult to get them back into place properly.  If the joints were filled with polymeric sand you may find that it is stuck to the side of the paver.  If this is the case, wet the stone to help soften up the sand and then use a putty knife to scrape the material off the sides of the paver. If there is no edge restraint installed, you should consider installing some.  There are a number of great “invisible edge” restraints available that are easy to install and are just spiked down into the base materials.   It is very important that the edge restraint is sitting directly on the compacted granular base, not the soft soils surrounding the project, as the spikes will not hold in the softer materials.  If you do not have a good base to spike the restraint to, you should do a little excavation and install a good stable base.

 Inspect the surface for any dips:   Dips in the pavement surface are usually caused by base or sub base settlement; new homes that have had a lot of property grading prior to the building of the home are more prone to this. Settlement should always be addressed, as it can cause water to pool on the surface which can create a hazard (winter ice!) in the short term and will lead to deeper dips in the long term. Identify the area that has been affected and mark with chalk. The most difficult part of this job is getting the first stone out!  If possible, try to start at an edge and work your way to the problem area. If this approach is not practical then you can try a couple of screwdrivers down either side of a stone to pry it up. Blasting the sand out with a hose first makes this much easier. Always start with the smallest stone in the pattern, as it will be the easiest one to get out. Once you get the first stone out, you can get under the other stones and the job becomes much easier.  When you have removed all the stones, re-level the area with the appropriate amount of sand and reinstall the stones, taking care to clean side of all the stones. You can tamp the stones with a block of wood placed on the surface and hitting with a hammer.  Never strike the surface of the stone directly as this can damage the paver surface.

       Inspect the surface for stains: You will be surprised what a good cleaning will do after a long winter to bring life back to your paving stones! If there are no serious stains to address, then a good pressure wash will do the job. If a pressure washer is not available, use a bit of dish detergent in some water and clean the area with a stiff bristle broom. For stains, or a paver surface requiring more serious cleaning, consider using a specialized concrete cleaner.  The most import tip to remember with any concrete cleaner is to read the instructions. There are right and wrong ways to use these products. The wrong way will diminish the effectiveness of the cleaner and may even lead to discoloration of the paver. Test the cleaner in a small unobtrusive area to make sure you are happy with the results before applying to the entire surface.

4.       Inspect the Joints:  If there are small weeds in the joints remove them.  Weeds are caused when seeds blow into joints and then germinate; they do not grow from beneath the pavers. This is one of the reasons why it’s so important to ensure that the material in the joints is in good shape. If your project has regular, un-stabilized sand in the joints, you may need to top it up so the joints remain full. If your project utilizes a stabilized sand (Polymeric or Unilock Easy Pro for example), or if you have used a joint stabilizing sealer on top of regular sand, this is less likely to be needed.  However, if this type of jointing material is in need of repair the best approach is to remove all of the old material and start fresh with new material.

5.       Consider Sealing: Sealing a paver surface is not necessary, but some homeowners like the way a sealer can enhance the color of their pavers and provide some stain protection.  If you chose to seal your paver project, you will need to re-seal every 3-5 years. High traffic areas like driveways will need to be re-sealed most often, but you should never apply sealer more frequently than 2 years. When selecting sealers, you can choose between a high gloss sealer, which will enhance the color of your paving stones or a matte finish that will simply help protect the pavers. Also, if you are re-sealing it is very important to use the same sealant as originally applied, there are a number of different sealants out there all having their own formulas. One of the critical components of re-sealing is that the new coat should dissolve the first coat and bond together to create a consistent surface protection. If you apply different sealers, you may not get this bonding action or you may have a chemical reaction that will turn the sealant milky. If you do not know what sealant has been applied previously then do a small test of an obscure area of pavers and see how the new sealer reacts.

Following this little bit of preventative maintenance every year will protect your investment and keep it looking great for years!


Monday, February 29, 2016

Spring Bloomers


As you look out your window after another long cold winter in Wisconsin you're probably wondering when you will see the first signs of spring right? The best cure for cabin fever is a spring bloom and a properly planted landscape should absolutely include some spring bloomers that let you know warm days are just around the corner. It's best to distribute these early bloomers into the design with shrubs, perennial borders and/or groupings, and a few trees in the mix.

Prunus Tomentosa

Prunus Tomentosa, The Manchu Cherry is one of the earliest blooming prunus; flowering before the leaves are even starting to develop. Manchu Cherry is extremely hardy, drought tolerant and matures to around 6'. As a gift that keeps on giving, the berries are edible and the exfoliating bark adds winter interest. Lilac, Juneberry, and Redbud are excellent choices as well.


Malus 'Louisa'

The Crabapples are probably the most common spring flowering trees. Similar to the Manchu Cherry, crabs typically begin to bloom before the leaves unfold. Blooms typically last several weeks. When choosing a crab, pay attention to resistance to diseases such as scab, mildew, and fire blight. Crab trees can be used for everything from screening to focal points as height ranges from 8' all the way up to 30'. Underplant with some late spring Anemone as a transition companion.


It is especially important to plan your perennial mix well as early spring bloomers often have little benefit once the bloom is complete. This can also be accomplished by choosing late spring bloomers and naturalizing or grouping bulbs for your early spring color. Many perennials, such as Columbine, should be planted with Huechera, Cranesbill or other low border plantings to assist in hiding fading foliage. Woodland natives such as Trillium or Foam-flower are a great choice for naturalized areas.

Friday, February 5, 2016

Greenscapes Again Earns Super Service Award in Multiple Categories by Angie's List


Greenscapes Earns Esteemed 2015 Angie’s List Super Service Award
Award reflects Greenscapes consistently high level of customer service


Greenscapes has earned the service industry’s coveted Angie’s List Super Service Award, reflecting an exemplary year of service provided to members of the local services marketplace and consumer review site in 2015.

"We are very excited to inform our staff that thier hard work and customer service has earned the Angie's List Super Service Award in multiple catergories for the second year in a row."

“Only about 5 percent of the landscape companies in the greater Madison area have performed so consistently well enough to earn our Super Service Award,” said Angie’s List Founder Angie Hicks. “It’s a really high standard.”

Angie’s List Super Service Award 2015 winners have met strict eligibility requirements, which include an “A” rating in overall grade, recent grade, and review period grade; the company must be in good standing with Angie’s List, pass a background check and abide by Angie’s List operational guidelines.

Service company ratings are updated daily on Angie’s List. Companies are graded on an A through F scale in areas ranging from price to professionalism to punctuality.

###


Angie's List helps facilitate happy transactions between more than three million consumers nationwide and its collection of highly rated service providers in more than 720 categories of service, ranging from home improvement to health care. Built on a foundation of more than 10 million verified reviews of local service, Angie's List connects consumers directly to its online marketplace of services from member-reviewed providers, and offers unique tools and support designed to improve the local service experience for both consumers and service professionals.

Thursday, January 14, 2016

Greenscapes of Madison Awarded Best Of Houzz 2016


Remodeling and Home Design

Greenscapes of Madison
Awarded Best Of Houzz 2016

Over 35 Million Monthly Unique Users Nominated Best Home Building,
Remodeling and Design Professionals in North America and Around the World

Madison, Wi, January 10th, 2016 – Greenscapes of Madison has won “Best Of Customer Service” on Houzz®, the leading platform for home remodeling and design. The premier landscape design, construction, and maintenance contractor was chosen by the more than 35 million monthly unique users that comprise the Houzz community from among more than one million active home building, remodeling and design industry professionals.

The Best Of Houzz is awarded annually in three categories: Design, Customer Service and Photography. Design award winners’ work was the most popular among the more than 35 million monthly users on Houzz. Customer Service honors are based on several factors, including the number and quality of client reviews a professional received in 2015. Architecture and interior design photographers whose images were most popular are recognized with the Photography award. A “Best Of Houzz 2016” badge will appear on winners’ profiles, as a sign of  their commitment to excellence. These badges help homeowners identify popular and top-rated home professionals in every metro area on Houzz.

“Anyone building, remodeling or decorating looks to Houzz for the most talented and service-oriented professionals” said Liza Hausman, vice president of Industry Marketing for Houzz. “We’re so pleased to recognize Greenscapes voted one of our “Best of Houzz” professionals by our enormous community of homeowners and design enthusiasts actively remodeling and decorating their homes.”


About Greenscapes
Our team of professionals offer superior customer service setting a high standard for innovative design and quality construction. Greenscapes provides award-winning landscape maintenance for commercial, condominium, and residential properties. Our snow removal services for Commercial properties in the Madison area offer reliable care with an unmatched attention to detail.

About Houzz
Houzz is the leading platform for home remodeling and design, providing people with everything they need to improve their homes from start to finish – online or from a mobile device. From decorating a small room to building a custom home and everything in between, Houzz connects millions of homeowners, home design enthusiasts and home improvement professionals across the country and around the world. With the largest residential design database in the world and a vibrant community empowered by technology, Houzz is the easiest way for people to find inspiration, get advice, buy products and hire the professionals they need to help turn their ideas 

Wednesday, December 23, 2015

Happy Holidays!

At the holiday season, 
our thoughts turn gratefully to those who have made our progress possible. 
It is in this spirit that we say... 
Thank you and best wishes 
for the holidays and happy New Year.


happy holiday.png

Wednesday, December 16, 2015

Holiday Lighting, How to spend less and get more.


According to Home Advisor the average holiday lighting installation nationally is $774. This may not seem like a huge investment to spread a little holiday cheer in the neighborhood right? How about after 5 years at an average of $3,870? Does it still sound like a good investment? Are you also putting up orange lights for Halloween? What about your summer landscape lighting, how much do you spend maintaining old light bulbs and replacing transformers?

What if we can combine all of your seasonal lighting with your summer landscape lighting? Using the Luxor ZDC we can accomplish this and even more. With a few swipes on your smart phone you can instantly dim and change colors of each light individually. At Christmas time you can change your lights to red, green and white without ever leaving the house. No more climbing trees, messing with tangled wires or falling off a roof. Having a Green Bay Packer party this Sunday? With some simple programming, you can click on your previously programmed GO PACK setting and instantly your lights turn to green and gold. Badgers are on tonight? Click your BUCKY program and go red! Once installed, you are set for every event, holiday by using your existing landscape lighting.

Learn more on our website or complete the contact form here.


Thursday, October 29, 2015

The Dummies' Guide to Winter Ponds in Wisconsin


It's getting to be that dreaded time of the year again in the Madison area. A few months filled with angst wondering if your finned friends will emerge from winter unscathed. Hopefully you have taken some recent steps to ensure that will be the case. You stopped fertilizing the plants long ago and you haven't fed the fish since the water temperatures went below 55 degrees. You have cut back the plants and either netted the pond or have removed any fallen leaves that worked their way into it. Take advantage of the video I posted above to learn more. In the meantime, here's a quick reference list provided by Aquascapes:
  • To shut your pond down, first unplug your pump and pull it out of the water. The pump should be stored in a frost-free location, submerged in a bucket of water to keep the seals from drying.
  • If you have fish, a small re-circulating pump that bubbles at the water surface is necessary to oxygenate the water. In all but extremely low temperatures, the bubbling of the pump will also keep a hole open in the ice to allow for a gas exchange, keeping your fish alive. It is not necessary to oxygenate the water or keep a hole open in the ice if you don't have fish.
  • If your area experiences long periods of extremely cold weather, you may consider adding a floating de-icer. Controlled by a thermostat, the unit only runs when the water temperature is at or below freezing, heats the water to just above that, and then shuts off again. Ask your installer or local supplier for products to help your pond during the winter.
  • If you use a floating de-icer, place it away from the bubbler. The movement of the water can move the heated water away from the de-icer, making it run more than necessary.
  • You can also choose to keep the waterfall running. This will require a little babysitting to make sure an ice dam does not form which could cause water to run out of the Pondless® Waterfall/ Pond basin. You will also still need to replace water loss so the pump can continue to function properly (see "The Water Level" above). This extra effort during the winter will reward you with the most beautiful ice formations and patterns around the falls and stream beds.
If it all sounds like too much this year complete this all in one step by signing up for Pond Shut Down Services!

Wednesday, September 30, 2015

Fall Clean Up Tips for the Madison Area


If you haven't signed up for fall clean up services, it's time to dust off your rake. Other than removing all the leaves, what else should be on your checklist?
  1. Winterize your lawn - Think of skipping this step as like sending a bear into hibernation without any stored fat! I'll discuss more on this next month.
  2. Watering shouldn't stop. If you have recently planted or potted plants, continue to water them. The easiest rule of thumb here is to water until you have to shut off the spigot for the winter.
  3. As mentioned in previous posts Thatch & Aerate
  4. Cut back and divide. Fall is a great time to tackle division of grasses, hosta, day lily, and other overcrowded plants.
  5. Lower your mowing deck again for a slightly lower cut.
  6. There's still time for fall planting as well.

5 Quick Tips About Fall Planting in Dane County


"Fall is for Planting" isn't just a marketing slogan. In fact, marketing and impatience is why most consumers complete planting in spring. Fall planting is the best way to get the highest rate of return on your investment as possible. Temperatures are mild, which mean woody plants and perennials will root faster. The typical droughts of August have passed and the cool nights of fall mean turf will establish quickly as well.

Follow these tips for fall plantings success:

  1. Whenever possible buy flats or in larger groups. Nurseries and Greenhouses do not want to carry the remaining stock over the winter. The more you buy, the more you save. Look through their inventory and consider completing borders and mass plantings with remaining plant stock. 
  2. Check the roots. When choosing perennials and smaller shrubs, pop the pot off and take a look at the roots. Often, staff has been cut down at this point and plant stock may not have been potted up. Fall sales might specifically include root bound plants as it is cheaper to discount them than it is to pot up a size this late in the year. 
  3. Have a lot of trees to plant? Consider bare root. We've planted hundreds of bare root trees for long term privacy screens, shade, or wind screens. If you are not in a race to get the largest tree possible, Check online catalogs with excellent customer reviews. Soak them in water for 24 hours as soon as they arrive and then plant away.
  4. Pick the plants who have current interest. We tend to shop on impulse and by sections of the yard we are trying to improve. I typically recommend clients complete tasks one a time rather than improving specific areas. Why spend money on a bed edger 5 times? Put in all your beds at once even if you won't plant them all right away. Pay attention to seasonality by shopping for only plants that have current seasonal interest. By only spring flowering plants in spring and buy plants with fall interest in fall.
  5. It's ok to go small. Save more money by choosing smaller plants in fall. As mentioned, the larger plants may be root bound anyway. Since you are planting in fall, you wont have water, nutrient and other competition issues with weeds. Most the weed seeds are now dormant and shouldn't be a factor. By the time they are competing with your smaller plant selections, it will already be established and adapted to its new habitat.

Read on

Contact Form

Name

Email *

Message *